Kubernetes is an open source container orchestration platform that automates the deployment, scaling, and management of containerized applications. For users running applications and workloads on Kubernetes, protecting resources and data from accidental deletion or hardware failures is crucial for maintaining business continuity and meeting compliance requirements. While Kubernetes provides high availability through its control plane and worker node redundancy, it does not inherently protect against human errors, such as accidental deletion of namespaces, deployments, or persistent volumes, nor does it safeguard against regional failures or data corruption.
The complexity of modern microservices architectures and the increasing scale of Kubernetes deployments make it even more critical to maintain regular, tested backups that can be restored consistently across different environments and Amazon Web Services (AWS) Regions. This includes backing up essential components such as entire namespaces, persistent volumes containing application data, custom resources, and configuration objects. Without proper backup mechanisms, organizations risk extended outages, data loss, and potential breach of service level agreements (SLAs). These can result in significant financial impact and damage to customer trust. This post introduces a new data protection tool and provides a step-by-step guide to implementing a proof-of-concept within a Kubernetes environment.
NetApp Trident Protect
NetApp Trident Protect is a free tool from NetApp that provides Kubernetes cluster data protection, data migration, disaster recovery, and movement of containerized workloads across AWS Regions and on-premises environments. It enables on-demand or scheduled data protection tasks for Kubernetes cluster resources and persistent volumes to externally supported storage backends such as Amazon S3. It offers automation capabilities through its Kubernetes-native API and powerful tridentctl-protect CLI, enabling programmatic access for seamless integration with existing workflows. AWS users can use Trident Protect to handle operations such as cross-cluster disaster recovery (between AWS Regions or within a Region), migration of stateful services between storage services, or moving resources running on a self-managed Kubernetes cluster into Amazon Elastic Kubernetes Service (Amazon EKS). The Amazon EKS and Trident backup architecture is shown in Figure 1.
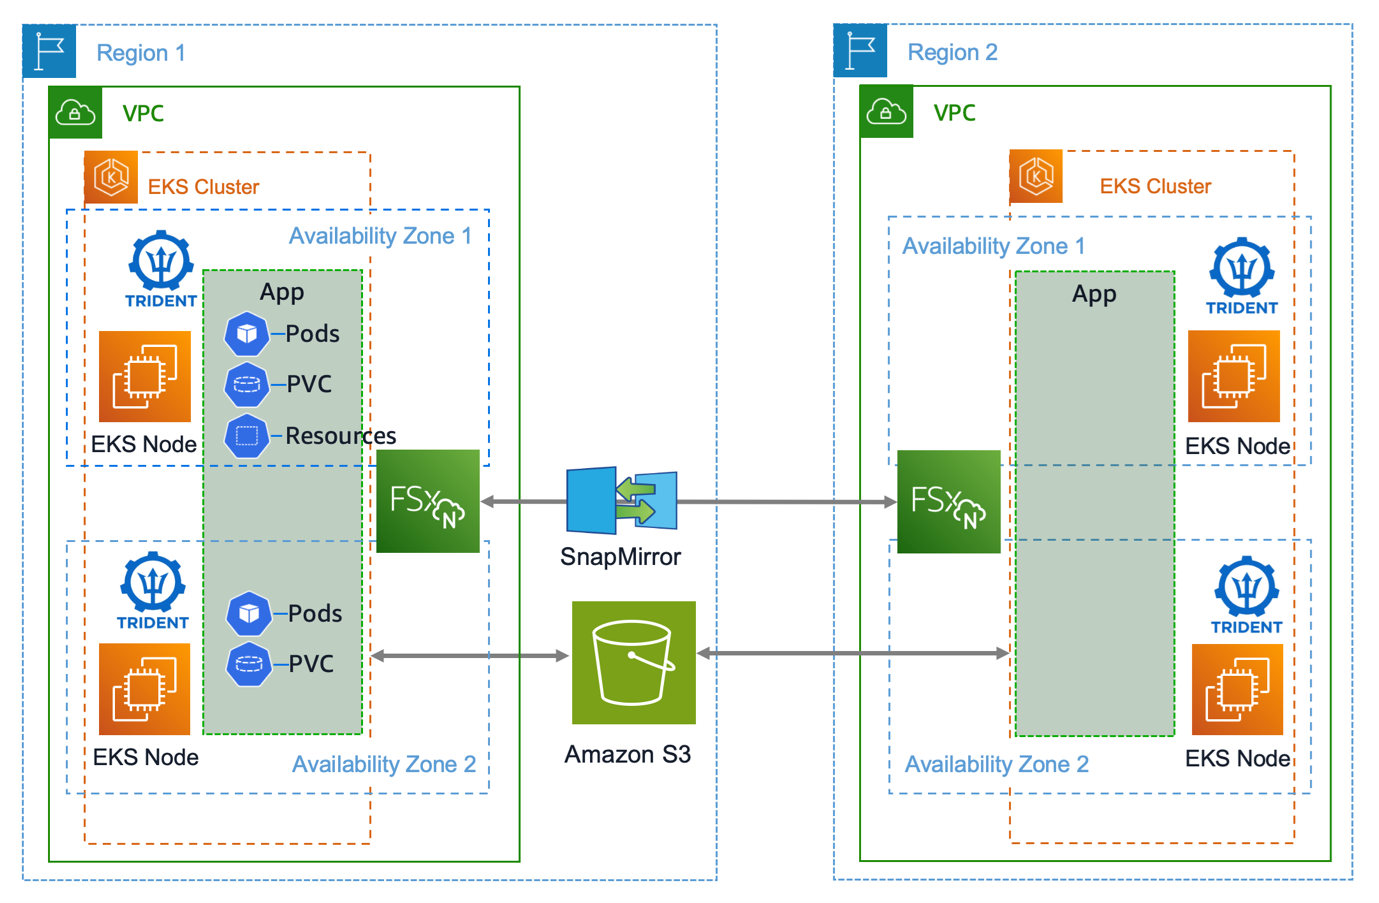
Figure 1. Amazon EKS and Trident backup architecture
Amazon FSx for NetApp ONTAP file system is a fully managed shared storage service, built on NetApp’s popular ONTAP file system. It provides users access to ONTAP’s enterprise storage features and services, such as thin provisioning, data deduplication, and the Snapshot functionality that drives NetApp agility in storage provisioning and data protection.
In this post, we focus on using Trident Protect with our AWS retail sample store application to handle data protection and migration tasks running on an EKS cluster. We also dive deep into some backup, recovery, and storage migration options that help you decide what is best to implement in your organization’s environment. The following architecture creates backups in our local AWS Region, which can be used to restore other namespaces within the same cluster and migrate from different AWS storage services.
Software architecture
The AWS retail store sample application is built from microservices and backed by several stateful services. In total they consume four Persistent Volume Claims (PVC) for each stack as in Figure 2.
-
- Assets: Serves static assets such as images related to the product catalog—needs RWX volume such as NFS.
- Orders: Receive and process user orders backed by MySQL DB and RabbitMQ—needs two RWO block storage volumes.
- Catalog: Product listings and details backed by MySQL DB—needs RWO block storage volume.
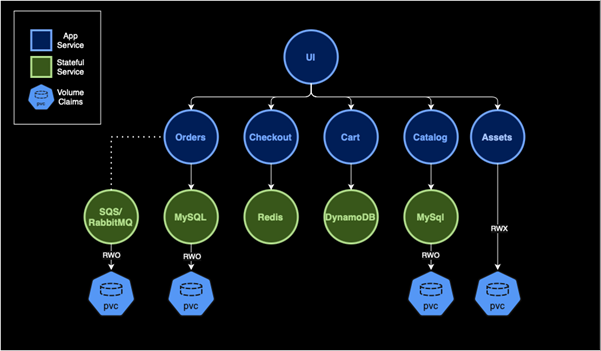
Figure 2. Sample retail store application
Prerequisites
To manually provision the resources used in this walkthrough, the following list provides the components and versions used. Alternatively, use the provided Terraform resources to automate the entire deployment as shown in Step 1 of the walkthrough.
- Amazon EKS cluster deployed version 1.32
- Pod Identity (eks-pod-identity-agent) add-on version v1.3.4
- NetApp Trident CSI add-on version 25.06
- Amazon EBS CSI add-on version v1.40.0-eksbuild.1
- Snapshot controller (snapshot-controller) add-on version v8.0.0
- Create
VolumeSnapshotClassfor Amazon Elastic Block Storage (Amazon EBS) and FSx for ONTAP (sample manifests are provisioned as part of the terraform deployment).
- Create
- Load balancer controller (aws-load-balancer-controller) version 2.11.0
- Deployed FSx for ONTAP file system.
Walkthrough
- Create necessary infrastructure with Terraform
Clone the sample repository from GitHub and create all relevant resources using the Terraform code in the repository:
This deployment can take 20-25 minutes to complete. When finished, the output of the command should look like the following:
Next, copy and run the AWS Command Line Interface (AWS CLI) command from the update_kubeconfig_command output and check that you can reach the cluster by running kubectl get nodes:
- Deploy Trident Protect into EKS cluster
Run the following commands to install the Trident Protect:
IMPORTANT: Make sure that you change clusterName to the EKS cluster name in your environment.
Expected output:
- Create S3 bucket
If you have an existing S3 bucket, then you can use it. If not, then use the following steps to create a new S3 bucket. Replace <bucket_name> and <aws_region> with your values:
- Create an EKS secret to store user credentials – Optional
EKS Pod Identity is the recommended method for IAM authentication, which has been configured as part of the initial terraform deployments. If you don’t want to use EKS Pod Identity for IAM authentication then create a secret to store the trident protect user AWS accessKey and secretKey. Make sure that the user credentials you provide have the necessary permissions to access the S3 bucket—go to the example Amazon S3 policy statement.
Use the following example to create the secret:
- Create Trident Protect AppVault
Create the Trident Protect AppVault. The AppVault points to the S3 bucket where both snapshots and backup content, data and metadata is stored. The AppVault is created in the dedicated trident-protect backup namespace created in Step 2 and can be secured with role-based access control (RBAC) to restrict access to privileged objects to administrators.
All remaining tasks are created either in the original application namespace or the target one in case of the restore examples. To create the AppVault, use the protect-vault.yaml sample manifest.
Update the following parameters:
providerConfig.s3.bucketName: the S3 bucket nameproviderConfig.s3.endpoint: the S3 endpoint if the bucket is not in theus-east-1RegionuseIAM: Use EKS Pod Identity for IAM authenticationproviderCredentials.accessKeyID.name: the EKS secret name from the previous stepproviderCredentials.secretAccessKey.name: the EKS secret name from the previous step
IMPORTANT: When using useIAM: true with EKS Pod Identity don’t set providerCredentials.accessKeyID.name and providerCredentials.secretAccessKey.name
Run the following command to create the AppVault:
To check if the AppVault was created successfully, run the following command:
Expected output:
- Create Trident Protect Application
To perform data protection operations on your Amazon EKS applications, you need to create a Trident Protect Application resource. An application can be defined in the following ways:
- As a namespace whereby everything that is part of the namespace must be protected
- As a subset of a namespace based on labels if you only want to protect part of a namespace (for example, only the PVC)
- It can span across multiple namespaces
- An application can also take into account cluster-wide resources
To define the namespaces in which the application resources exist, use spec.includedNamespaces and specify namespace labels or a namespace name. You can use this sample trident-application.yaml manifest to define an Application for the sample-app.
Run the following to create the Application:
To check that the application was created successfully run the following command:
Expected output:
Backup, restore, and migration walkthrough
Create application backup
Trident Protect has several data protection options available:
- On-demand snapshot
- On-demand backup
- Data protection schedule
- Application replication
- Application migration
In this post, we focus on on-demand backup and application migration, but you can read more about how to use the other data protection options in the preceding link references.
To create an on-demand backup for the sample application, you create a backup resource for the Application you just created and point it to the Amazon S3 created AppVault. You can use the following trident-backup.yaml sample manifest:
Run the following to create the backup:
To check if the Backup was created successfully, run the following command:
Expected output:
IMPORTANT: The state of the backup can be running while the backup is in progress. Wait until the status gets to Completed. If the status is Failed, then use kubectl describe backup -n tenant0 sample-app-backup-1 to get more details on the failure.
If you check your Application Protection State, then it is now set to Partial because you just have an on-demand backup set for your application, but no backup schedule. You can use kubectl describe application -n tenant0 to check the status.
Restore application from a backup
Trident Protect has several recovery options available:
- Restore from backup
- Restore from snapshot
In this post, we focus on restoring the sample-app backup to a different namespace on the same EKS cluster. You can read more about how to use the other recovery options in the preceding link references. The following is a review of the BackupRestore resources spec:
spec.appArchivePath: The path in theAppVaultwhere the backup contents are stored.
You can retrieve the Archive Path by issuing the following command on your backup:
spec.appVaultRef: The name of theAppVaultwhere the backup contents are stored.spec.namespaceMapping: The mapping of the source namespace of the restore operation to the destination namespace.
You can use the following trident-protect-backup-restore.yaml sample manifest:
If you need to choose only specific resources within the application to restore, then use the following filtering to include or exclude resources marked with particular labels.
resourceFilter.resourceSelectionCriteria: UseIncludeorExcludeto include or exclude a resource defined inresourceMatchers.resourceFilter.resourceMatchers:resourceMatchers[].group:Group of the resource to be filteredresourceMatchers[].kind:Kind of the resource to be filteredresourceMatchers[].version:Version of the resource to be filteredresourceMatchers[].names:Names in the Kubernetes metadata.name field of the resource to be filteredresourceMatchers[].namespaces:Namespaces in the Kubernetes metadata.name field of the resource to be filteredresourceMatchers[].labelSelectors:Label selector string in the Kubernetes metadata.name field of the resource
For an example, you could use this sample code to include resources in your BackupRestore manifest:
NOTE: The application recovery uses a LoadBalancer Type service in Amazon EKS, thus you should exclude the TargetGroupBinding resources so that the AWS Load Balancer Controller can create a new TargetGroupBinding for the new namespace that isn’t in conflict with the existing application on the cluster.
Run the following to create the BackupRestore:
To check if the BackupRestore was created successfully, run the following command:
Expected output:
IMPORTANT: The state of the BackupRestore can be running while the restore is in progress. Wait until the status gets to Completed. If the status is Failed, then use kubectl describe backuprestore -n tenant1 sample-app-restore-1 to get more details on the failure.
After the restore process is finished, you can verify that your recovered application is up and running by accessing the UI service endpoint in your browser. You can get the UI service endpoint by issuing the following command:
If everything was successful, then you should get the UI that looks like Figure 3:

Figure 3. Restored retail store application
Migrate between storage services
On this step, you migrate parts of the sample application stateful services from one storage service to another. You should do that using the storageClassMapping feature of the Trident Protect BackupRestore. You should migrate the catalog service MySQL database from an EBS volume to an FSx for ONTAP volume using iSCSI presented LUNs.
To do that, execute two BackupRestore resources. One recovers all sample-application resources and data except for the catalog-mysql statefulset, and the other recovers and migrates the catalog-mysql statefulset from Amazon EBS to FSx for ONTAP block storage.
Review the trident-protect-migrate.yaml. Use resourceFilter to exclude and include resources from the recovery process and storageClassMapping to migrate stateful resources to different storage backends.
IMPORTANT: Make sure you update spec.appArchivePath on both resources. You can retrieve the Archive Path by issuing the following command on your backup:
You can check the source application and see that the original volume is using Amazon EBS by using the same command:
Expected result:
Run the following to create the BackupRestore resources needed for the migration:
To check if the BackupRestore resources were created successfully run the following command:
kubectl get backuprestore -n tenant2
IMPORTANT: The state of the BackupRestore can be running while the restore is in progress. Wait until the status gets to Completed. If the status is Failed, use kubectl describe backuprestore -n tenant2 sample-app-migrate-# to get more details on the failure.
Expected result:
You can check that the catalog-mysql PVC was migrated from Amazon EBS to FSx for ONTAP by issuing the following command:
Expected result:
After the migration process is finished, you can verify if your migrated application is up and running by accessing the UI service endpoint in your browser. You can get the UI service endpoint by issuing the following command:
If everything was successful, then you should get the UI that looks like Figure 4:
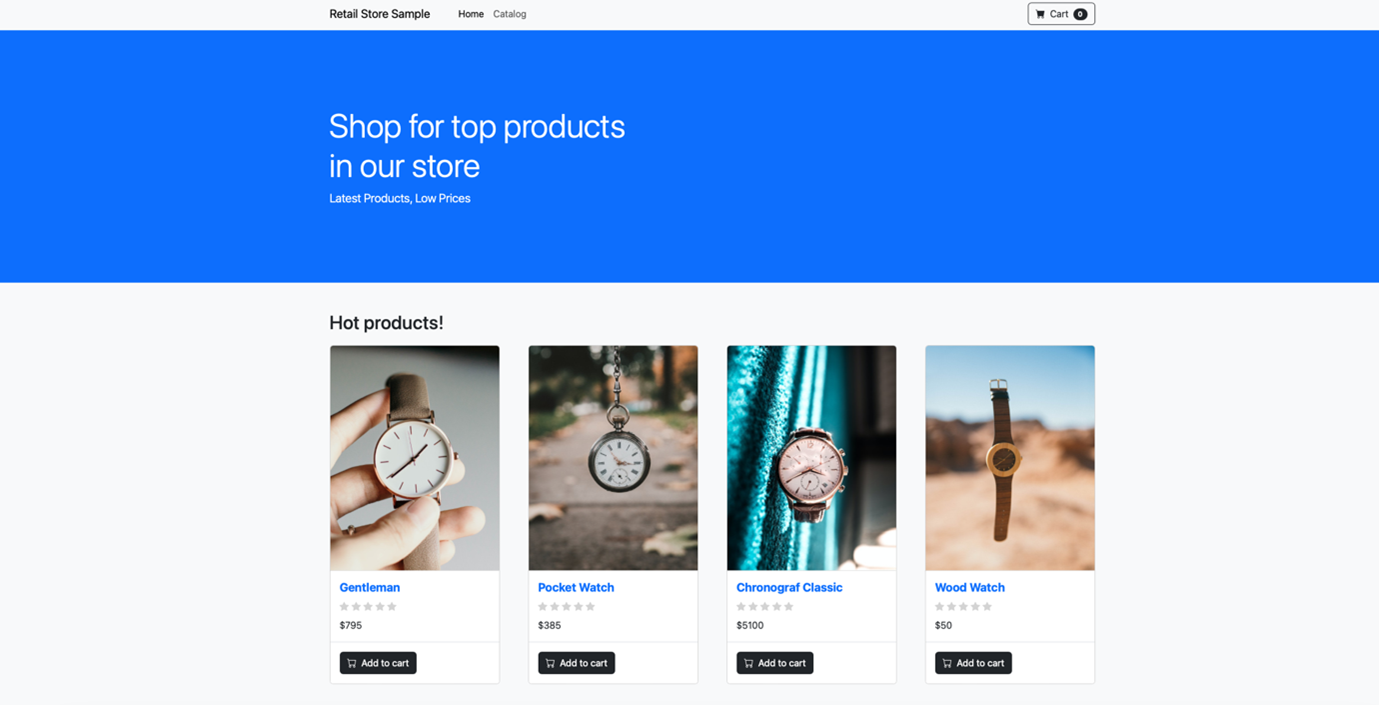
Figure 4. Restored retail store application after PVC migration.
Congratulations! You’ve completed and mastered the basics of Amazon EKS backup, recovery, and migration using NetApp Trident Protect. This guide can be used as a best practice to implement protection, migration, and disaster recovery in your environment.
Cleaning up
To avoid unnecessary charges, make sure to delete all of the resources created with Terraform by running the following script from your terminal:
If you created a new S3 bucket for this exercise, then clean up by going to the Amazon S3 console, emptying the bucket, and deleting it.
Conclusion
In conclusion, NetApp Trident Protect provides a powerful solution for streamlining data protection of Kubernetes environments. This approach addresses the critical need for comprehensive backup strategies in cloud-native architectures. NetApp Trident Protect enables users to efficiently create and manage backups of entire namespaces, persistent volumes, and other essential Amazon EKS resources, making sure of business continuity and compliance with data protection requirements.
The step-by-step guide presented in this post demonstrates the ease of setting up and using NetApp Trident Protect with Amazon EKS, Amazon FSx for NetApp ONTAP, and Amazon EBS. Thank you for reading this post. Leave any comments or questions in the comments section.