Customers in regulated industries like Government, Financial Services, and Insurance need advanced data controls to meet legal, regulatory, and operational requirements for managing and governing their file data. In addition, customers with complex storage environments like large enterprises, System Integrator (SI) partners, and multi-tenant SaaS providers need streamlined ways to manage data and implement fine-grained controls in their FSx for Windows file systems. However, an integrated method to address these requirements was not available, and storage administrators that wanted additional controls on their file servers had to seek third party integrations or external solutions. To solve this problem, Amazon has recently announced support for File Server Resource Manager (FSRM) in FSx for Windows File Server. FSRM support is available starting this week, at no additional cost, and today we will look at the features and how to get started quickly with setting a folder-level quota and enabling file screening.
With FSRM, storage administrators can now classify and identify sensitive data using file classification, enabling better data governance and compliance management. They can gain deeper insights into storage patterns and optimize resource utilization through comprehensive storage reports. With file screen policies, administrators can proactively control the types of files stored in their file systems by blocking unauthorized file types, preventing storage of prohibited content. Additionally, administrators can configure fine-grained quota controls by setting folder-level quotas, expanding on user and group quotas that were already available. FSRM events can be published to Amazon CloudWatch Logs or Amazon Kinesis Data Firehose, allowing storage administrators to query, process, store, and archive logs, trigger AWS Lambda functions to take reactive actions based on file events, and perform advanced monitoring and analysis to automate file system administration.
Managing FSRM is done the same way as managing advanced features on FSx for Windows File Server—by using the Amazon FSx CLI for remote management on PowerShell. Administrators can now access over 50 FSRM management commands to comprehensively configure and manage all FSRM features across your storage infrastructure. These PowerShell management commands (cmdlets) can also be scripted or used with existing automation methods to enable powerful workflows.
Example scenario: Individual folder quotas and file screening
In this section we examine a simple example. In our scenario, an agency has separate departments for Engineering, Marketing, and Sales.
For the scenario, we apply a hard quota to each department directory, then add file screening to the parent directory. A hard quota prevents writing to the directory when the overall size hits the quota value while file screening prevents certain file types from being stored based on the file extension.
Before we begin, we prepare our test environment, which requires the following:
- FSx for Windows File Server file server:
- SSD storage.
- At least 128 MB/s of throughput capacity.
- PowerShell jump box that can remote PowerShell into the FSx for Windows File Server PowerShell endpoint. This machine needs to be joined to the same domain as the FSx for Windows instance. We refer to this as the JUMPBOX in our tutorial.
- Client computer that can access the FSx for Windows File Server file share. This can be the same computer as the PowerShell jump box. This machine needs to be joined to the same domain as the FSx for Windows instance. We refer to this as the CLIENT in the example.
When we have the requirements sorted, we can move on to enabling and testing FSRM in our FSx for Windows File Server environment.
Configure FSRM on FSx for Windows File Server
To begin, we log in to the Amazon Web Services (AWS) web console and enable FSRM for our FSx for Windows File Server. In the command sections below, the PowerShell prompt will be black, the commands to be entered will be green, and the output of the commands will be blue.
1. Log in to the and navigate to FSx, then choose the FSx for Windows File Server with which we are working. Choose fs-xyz (where fs-xyz is the filesystem ID) link in the list of FSx file systems to open the summary page.
2. On the summary page, choose Administration.
3. Scroll down to File Server Resource Manager (FSRM) and choose the Manage button on the right side as shown in Figure 1.
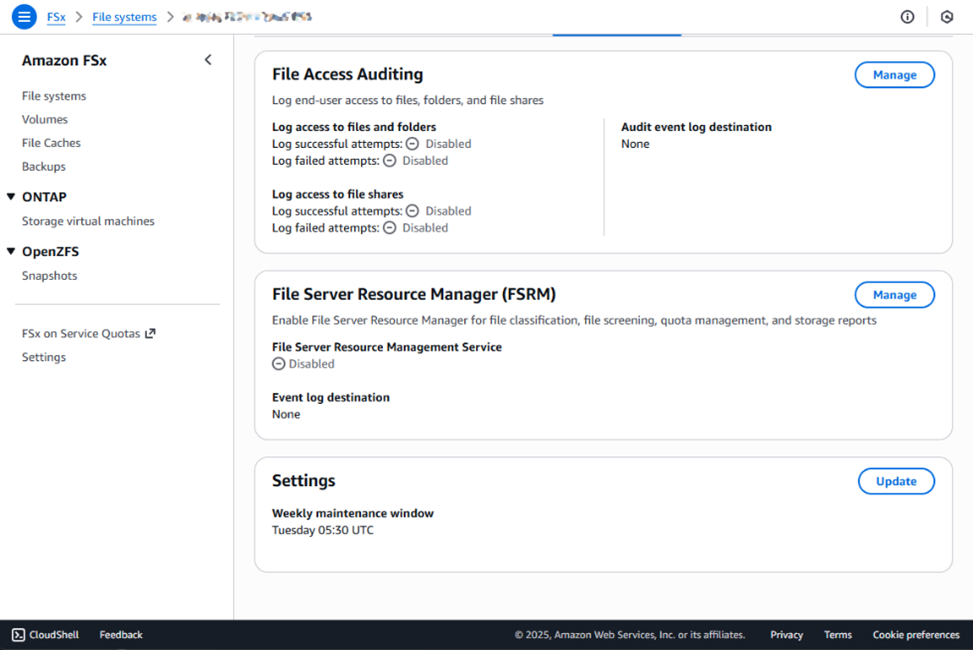
Figure 1: FSRM management interface
4. In the dialogue box pop-up, check the check box for Enable File Server Resource Management Service, and choose Save on the bottom-right of the dialogue box as in Figure 2 and Figure 3.
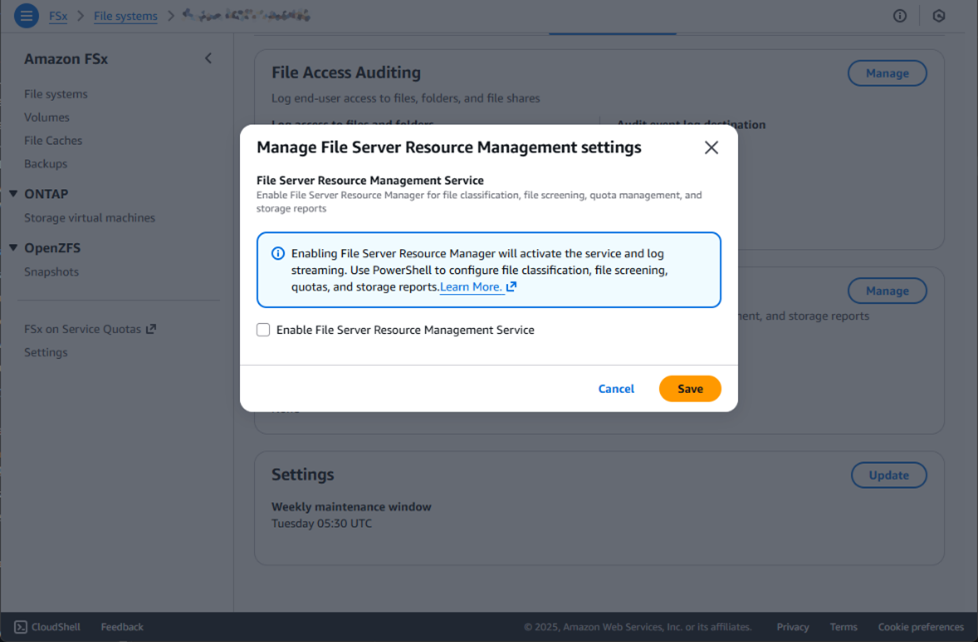
Figure 2: FSRM is not chosen in this dialogue box
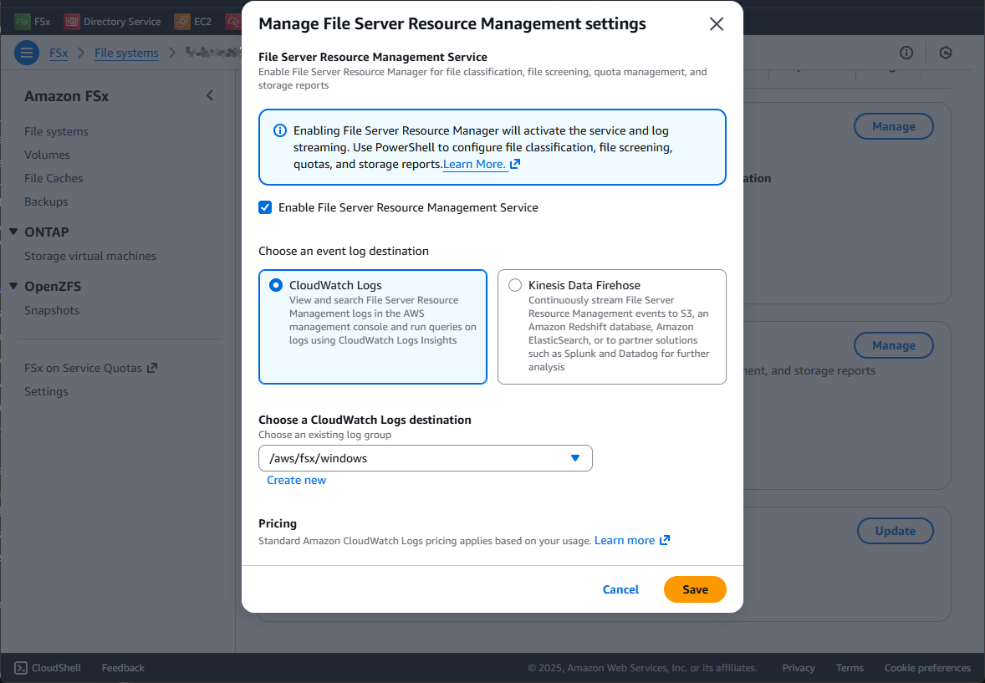
Figure 3: FSRM is chosen in this dialogue box
5. It takes several minutes for the management interface to finish running checks and enable FSRM. We can refresh the page to check the status. When the status says Enabled in green, we are ready to proceed to the next section and start working with FSRM.
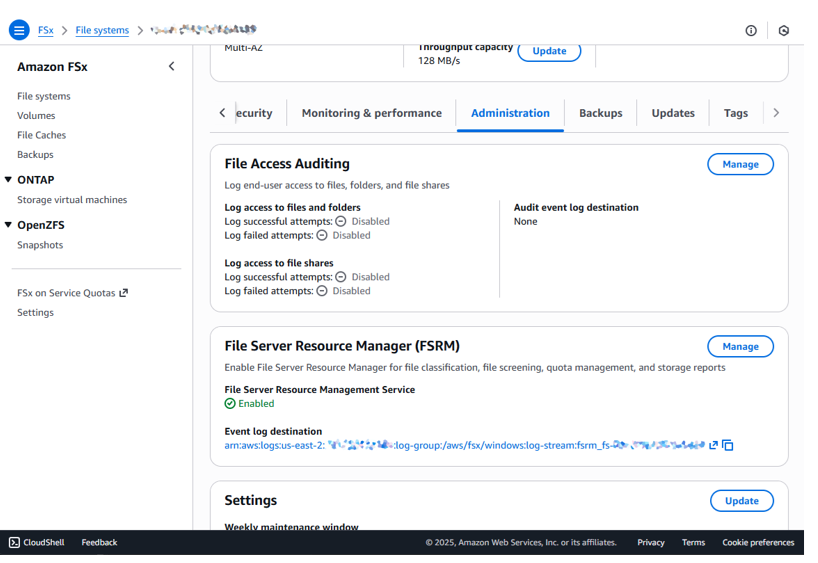
Figure 4: FSRM is enabled and ready to use
Set up FSRM folder quotas on FSx for Windows File Server
Now that FSRM is enabled on FSx for Windows File Server, we can start by enabling hard folder quotas.
1. Use our CLIENT and browse to our FSx for Windows File Server. Then, we list the directory structure in which we’re interested, located under D:shareDepartments:
PS C:> pushd \<fsxwindowsid.dns.name>share
PS Microsoft.PowerShell.CoreFileSystem::\<fsxwindowsid.dns.name>share> tree Departments
Folder PATH listing for volume <VOLUME NAME>
Volume serial number is <SERIAL NUMBER>
\<fsxwindowsid.dns.name>SHAREDEPARTMENTS
├───Engineering
├───Marketing
└───Sales
2. Now that we can observe the directory structure, we use our JUMPBOX and remote PowerShell to apply a unique quota to each department directory:
PS Microsoft.PowerShell.CoreFileSystem::\<fsxwindowsid.dns.name>share> invoke-command -ComputerName <fsxwindowsid.remote-ps.name> -ConfigurationName FsxRemoteAdmin -scriptblock { New-FsxFsrmQuota -Folder "shareDepartmentsEngineering" -Description "Limit Engineering to 2GiB" -Size 2GB }


PSComputerName : <fsxwindowsid.remote-ps.name>
RunspaceId : <RunspaceId>
Description : Limit Engineering to 2GiB
Disabled : False
MatchesTemplate : False
Path : D:shareDepartmentsEngineering
PeakUsage : 1024
Size : 2147483648
SoftLimit : False
Template :
Threshold :
Usage : 1024


PS Microsoft.PowerShell.CoreFileSystem::\<fsxwindowsid.dns.name>share> invoke-command -ComputerName <fsxwindowsid.remote-ps.name> -ConfigurationName FsxRemoteAdmin -scriptblock { New-FsxFsrmQuota -Folder "shareDepartmentsMarketing" -Description "Limit Marketing to 4GiB" -Size 4GB }


PSComputerName : <fsxwindowsid.remote-ps.name>
RunspaceId : <RunspaceId>
Description : Limit Marketing to 4GiB
Disabled : False
MatchesTemplate : False
Path : D:shareDepartmentsMarketing
PeakUsage : 1024
Size : 4294967296
SoftLimit : False
Template :
Threshold :
Usage : 1024


PS Microsoft.PowerShell.CoreFileSystem::\<fsxwindowsid.dns.name>share> invoke-command -ComputerName <fsxwindowsid.remote-ps.name> -ConfigurationName FsxRemoteAdmin -scriptblock { New-FsxFsrmQuota -Folder "shareDepartmentsSales" -Description "Limit Sales to 1GiB" -Size 1GB }


PSComputerName : <fsxwindowsid.remote-ps.name>
RunspaceId : <RunspaceId>
Description : Limit Sales to 1GiB
Disabled : False
MatchesTemplate : False
Path : D:shareDepartmentsSales
PeakUsage : 1024
Size : 1073741824
SoftLimit : False
Template :
Threshold :
Usage : 1024
We should now have hard quotas on all three sub-directories as demonstrated in the following table:
| Directory | Limits and quotas |
| Engineering | 2 GiB |
| Marketing | 4 GiB |
| Sales | 1 Gib |
Table 1: Hard quotas set for each directory
3. Now that we have quotas created, we can use the CLIENT and create a test file to test the quotas that were just created. We create a 750 MiB test file under the Sales directory.
PS Microsoft.PowerShell.CoreFileSystem::\<fsxwindowsid.dns.name>share> cd .DepartmentsSales
PS Microsoft.PowerShell.CoreFileSystem::\<fsxwindowsid.dns.name>shareDepartmentsSales> fsutil file createnew 750MB.bin 786432000
File \<fsxwindowsid.dns.name>shareDepartmentsSales750MB.bin is created
4. Recall that in Step 2, we set the quota for the Sales directory to 1 GiB. If we attempt to create another 750 MiB test file, the operation should fail. This is because the total directory size would be 1.5 GiB while we have a hard quota set for 1 GiB:
PS Microsoft.PowerShell.CoreFileSystem::\<fsxwindowsid.dns.name>shareDepartmentsSales> fsutil file createnew Another_750MB.bin 786432000
Error 112: There is not enough space on the disk.
We can also try manually copying a large file into the Sales directory using the GUI and observe the error message that comes up when attempting to write the file as shown in Figure 5:
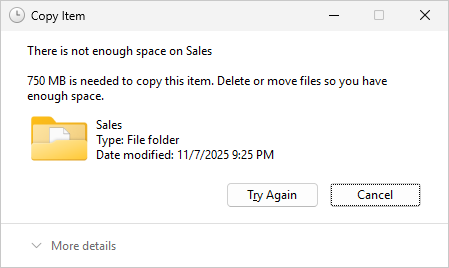
Figure 5: FSRM folder quotas prevent writing into the Sales directory
5. We can go into the Engineering directory and create a 1500 MB file, which works because the quota set for this directory is 2 GiB:
PS Microsoft.PowerShell.CoreFileSystem::\<fsxwindowsid.dns.name>shareDepartmentsSales> cd ..Engineering
PS Microsoft.PowerShell.CoreFileSystem::\<fsxwindowsid.dns.name>shareDepartmentsEngineering> fsutil file createnew 1500MB.bin 1572864000
File \<fsxwindowsid.dns.name>shareDepartmentsEngineering1500MB.bin is created
Set up FSRM File Screening on FSx for Windows File Server
Now that we have folder quotas setup for our departments, we can add File Screening to the parent directory. File Screening works by examining the file extension and comparing it against File Screen rules. In this scenario, we want to prevent executable files from being stored into the Departments directory.
1. Use our JUMPBOX and remote PowerShell to add the File Screen rule:
PS Microsoft.PowerShell.CoreFileSystem::\<fsxwindowsid.dns.name>shareDepartmentsEngineering> invoke-command -ComputerName <fsxwindowsid.remote-ps.name> -ConfigurationName FsxRemoteAdmin -scriptblock { New-FsxFsrmFileScreen -Folder "shareDepartments" -IncludeGroup "Executable Files" -Active }


PSComputerName : <fsxwindowsid.remote-ps.name>
RunspaceId : <RunspaceId>
Active : True
Description :
IncludeGroup : {Executable Files}
MatchesTemplate : False
Notification :
Path : D:shareDepartments
Template :
2. The File Screen is added to the Departments directory and all directories underneath. Now we can test and observe if we can write an executable file into the Departments root directory:
PS Microsoft.PowerShell.CoreFileSystem::\<fsxwindowsid.dns.name>shareDepartmentsEngineering> cd ..
PS Microsoft.PowerShell.CoreFileSystem::\<fsxwindowsid.dns.name>shareDepartments> cp $env:windirsystem32calc.exe .
cp : Access to the path '\<fsxwindowsid.dns.name>shareDepartmentscalc.exe' is denied.
At line:1 char:1
+ cp $env:windirsystem32calc.exe .
+ ~~~~~~~~~~~~~~~~~~~~~~~~~~~~~~~~~~
 + CategoryInfo : PermissionDenied: (C:Windowssystem32calc.exe:FileInfo) [Copy-Item], UnauthorizedAccessException
 + FullyQualifiedErrorId : CopyFileInfoItemUnauthorizedAccessError,Microsoft.PowerShell.Commands.CopyItemCommand
We can try writing an executable file into the directory using the GUI as shown in Figure 6:
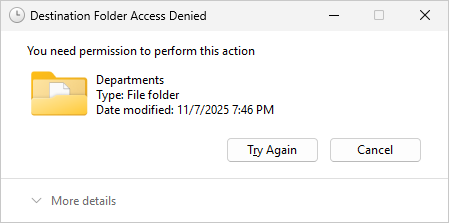
Figure 6: FSRM File Screening prevents writing an executable into the Departments directory
Cleaning up: how to disable FSRM
To clean up, we will disable FSRM from the AWS console.
1. Log in to the AWS console and navigate to FSx, then choose the FSx for Windows File Server that we are working with Choose fs-xyz (where fs-xyz is the filesystem ID) link in the list of FSx file systems to open the summary page.
2, On the summary page, choose the Administration
3. Scroll down to File Server Resource Manager (FSRM) and choose the Manage button on the right side as shown in Figure 7.

Figure 7: FSRM management interface
4. In the dialogue box pop-up, choose Disabled in the drop box for Enable File Server Resource Management Service, and choose Save on the bottom-right of the dialogue box.
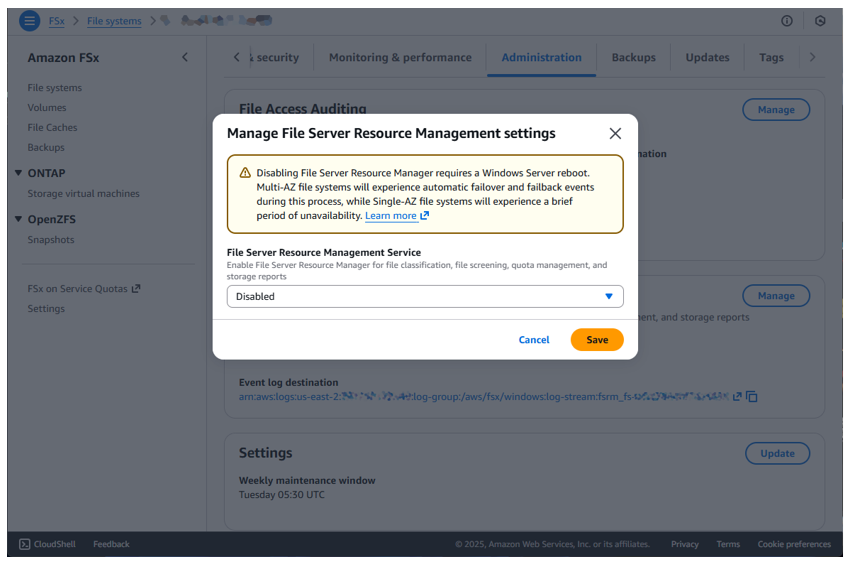
Figure 8: FSRM is disabled in this dialogue box
5. It takes several minutes to disable FSRM. During this time, the FSx for Windows File Server file system reboots. Multi-Availability Zone file systems experience an automatic failover and aren’t impacted, while Single-AZ file systems have a brief interruption while the file system is rebooted. We can refresh the page to check the status. When the status changes to Disabled in grey, FSRM has been disabled on the file server.
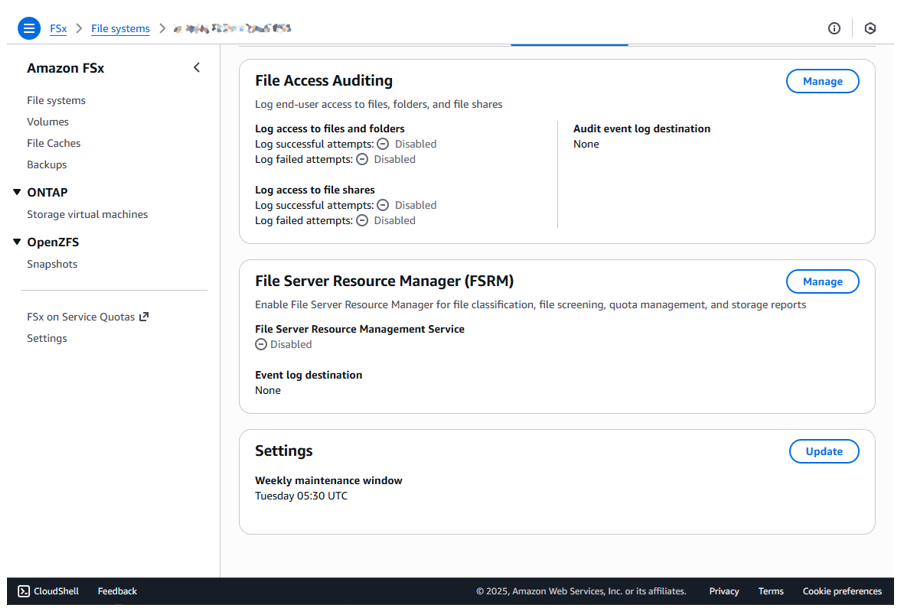
Figure 9: FSRM is disabled
Conclusion
In this post, we demonstrated how to enable FSRM on an Amazon FSx for Windows File Server file system, apply folder quotas, and enable file screening rules. Visit our User Guide to learn about the full feature set and commands available. Look for upcoming posts and videos with more advanced guides and tutorials on using FSx for Windows File Server with FSRM.
If you have any comments or questions, please leave a comment.